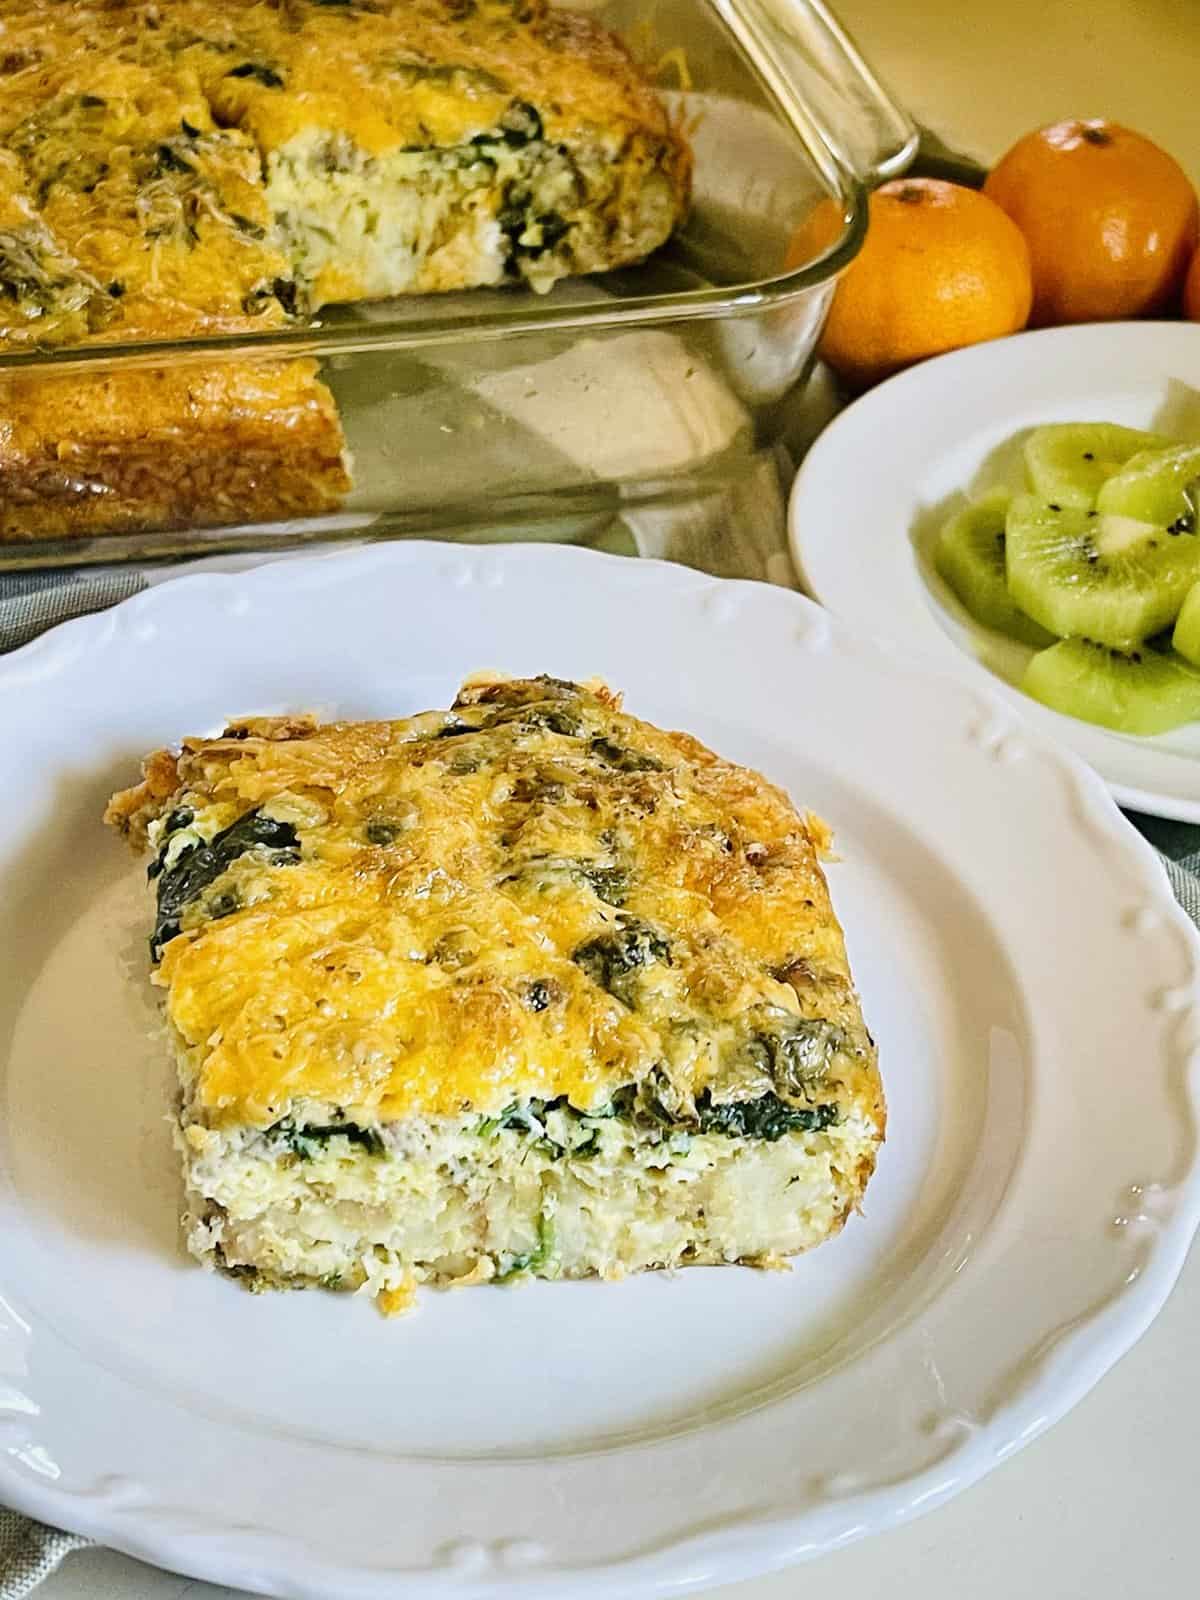
This breakfast casserole for two is perfect for two people!
Every time I look for recipes, I come across recipes that are designed for a 9×13-inch dish. While leftovers are great, it’s only my husband and I in the house, and that’s just too much food.
As an Amazon Associate, I earn from qualifying purchases at no additional cost to you.
Also, I have been trying really hard not to have waste at the end of the week due to the cost of groceries, and I could freeze some breakfast casserole, but honestly, that’s just not my style. I’d rather make a new one in a few weeks so it’s fresh.
Ingredients
Tater Tots, or shredded hashbrowns
Pork Sausage, or whatever kind of crumbled breakfast sausage you like (my homemade pork ground sausage is perfect in this recipe)
Eggs, of course
Cheese, I used cheddar but feel free to change it up with Monterey Jack, Pepper Jack, Mozzarella, or anything else that sounds appealing to you
Spinach, I only recently started adding this into the sausage once it’s cooked before layering it up, but it’s some added veggies that you don’t even taste
I know this list is short! It’s because this recipe is so darn easy!
Of course, feel free to add extra veggies. If you do I would recommend sauteing them for a bit before adding them to the breakfast casserole so they are a little soft when it’s cooked.
How to Cook the Breakfast Casserole for Two
Cook your breakfast sausage and add spinach at the end to wilt it down a bit and then set aside. It’s time to layer it up!
Spray the bottom or wipe the bottom down with a little oil so nothing sticks.
Layer of Tater tots on the bottom; fill that bottom up so it makes a platform for the meat and spinach.
Add the meat and spinach on top of the tots. Whisk your 8 eggs in a bowl until they are smooth with a dash of salt and pepper. (See my tips for making The Best Scrambled Eggs here)
Pour your scrambled egg mixture evenly over your Tator tots, sausage, and spinach mixture. Shred enough cheese to cover the top.
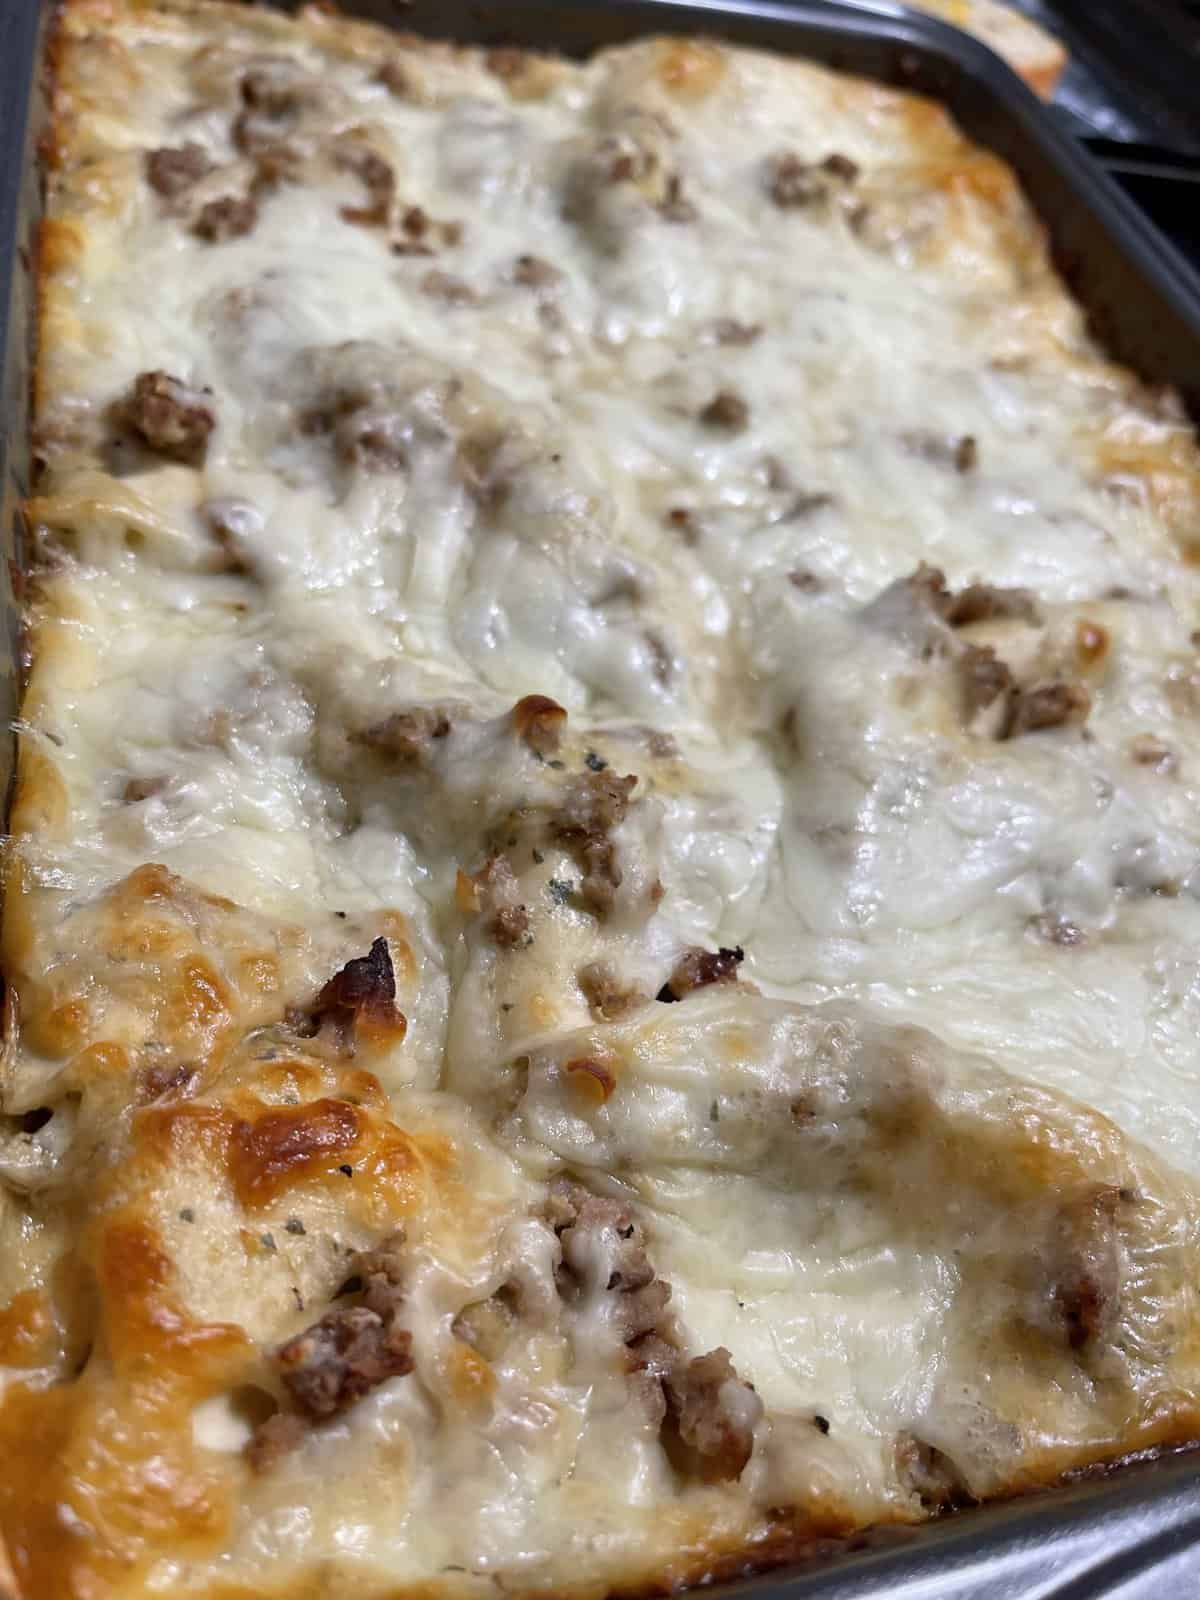
Cover and bake your breakfast casserole for two in a preheated 375-degree oven for about 30 mins. Then uncover and cook for another 10 mins til the cheese is browned and beautiful on top.
Other Things to Note
Dish Size: This recipe is made using an 8×8-inch glass dish which means there won’t be a ton of leftovers. I always cut this little casserole into 4 squares. I eat 1, and my husband will eat 1 or 2. Which means there is always 1 or 2 pieces left over. This is SUCH a more manageable amount of leftovers than cooking a 9×13-inch for just the two of us.
My favorite baking dish from Amazon includes a lid for easy storage or travel.
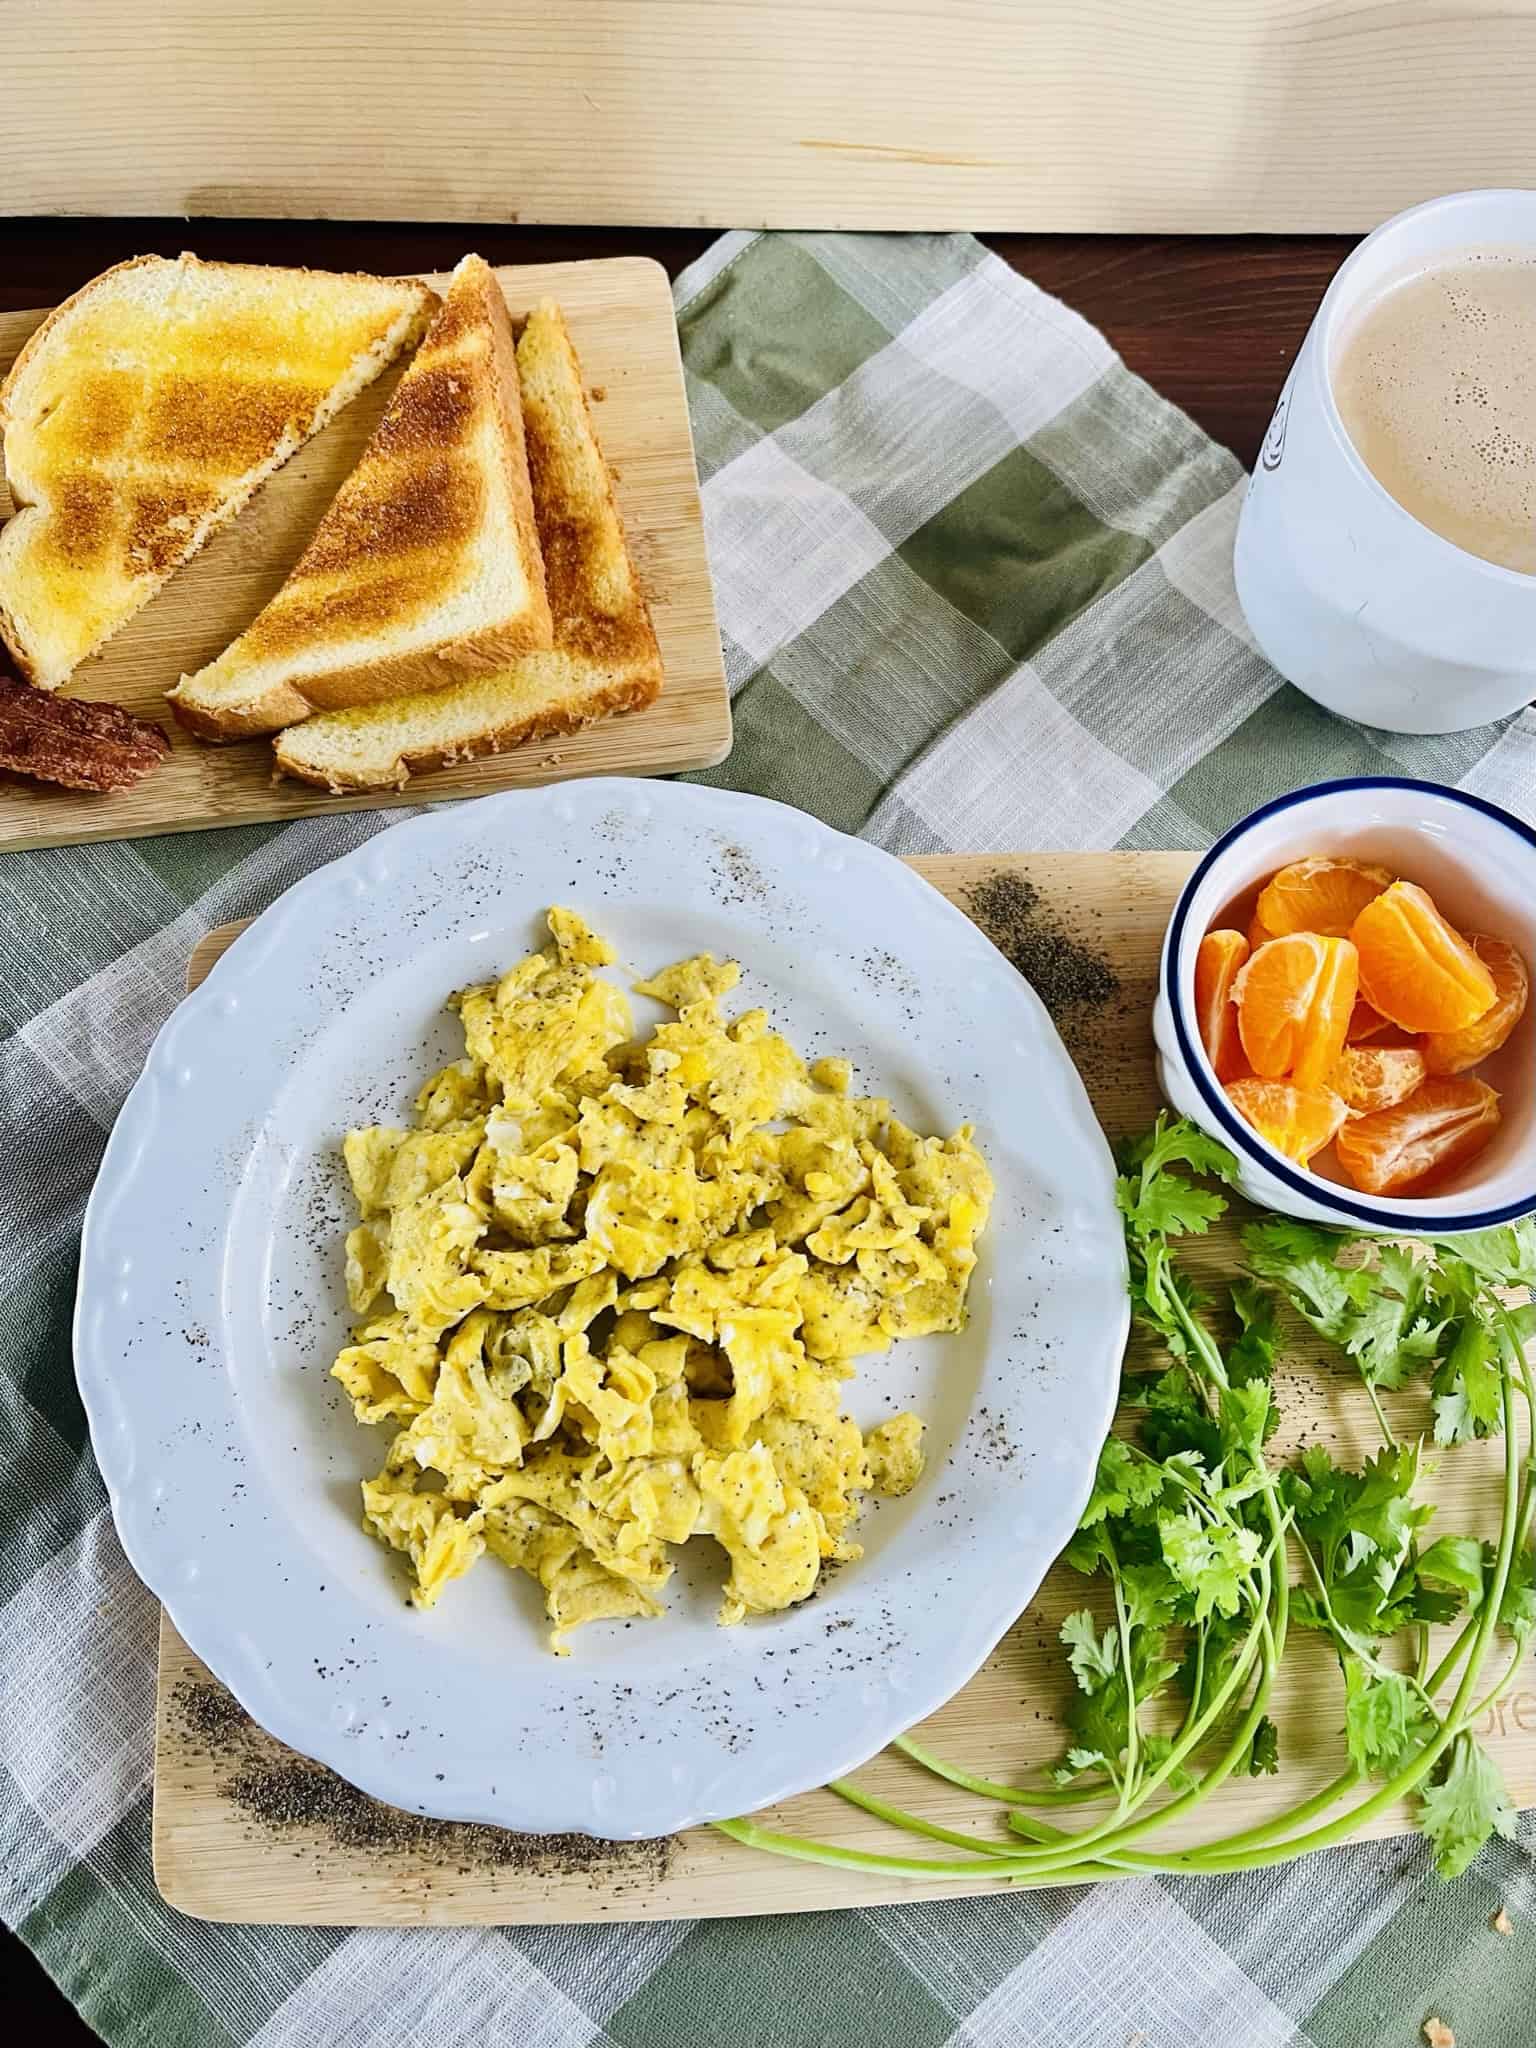
Serving: I always serve this breakfast casserole for two with a cup of coffee and some fruit! I’ve made this side dish with a person or two over for company and just cut up a bunch of fruit or made a side of pancakes or muffins, and it always works out.
Taco Sauce: This dish is PERFECT coated in taco sauce! Our favorite taco sauce is by Herdez to put on top! And we don’t skimp on it, we always keep it on hand! Check it out here.
Wake up your taste buds and say goodbye to boring mornings with this ultra-satisfying breakfast casserole for two that’s bursting with flavor and guaranteed to fuel your day. Imagine layers of crispy golden tater tots nestled alongside juicy sausage crumbles, all smothered in a lusciously cheesy egg custard that bakes to fluffy perfection in just one hour. It’s comfort food made heavenly, perfect for a lazy weekend together or meal-prepped into baggies for a couple of days.
Turn down the heat and add spinach just til wilted. Then set aside.
Coat the bottom of an 8×8-inch square cooking dish with oil.
Layer Tator tots to cover the bottom of the dish.
Next, layer the sausage and spinach mixture on top tots.
Whisk all 8 eggs in a separate dish with a dash of salt and pepper (until smooth).
Pour egg mixture over sausage, spinach, and tots.
Place shredded cheese as the top layer.
Cover loosely with foil and bake for 30 mins. Remove foil and bake for 10 more mins. (Disclaimer since all ovens are different: When checking to see if it’s done, you should be able to wiggle the dish a bit, and there should be no movement. The eggs should be set)
Let cool for 10 mins, then enjoy!!
We enjoy ours with a little taco sauce or salsa! Yum!
Are you thinking about buying a house with acreage?? Here are my “Things to consider” list before you buy.
My husband and I bought a beautiful 10-acre piece of land with a little cottage on it in Northern California in 2017. We actually rented the house for about 4 years before buying it so we’ve lived here for more than a decade. The choice to move up here was made because my husband’s aunt and uncle owned the house next door on 10 acres of their own. Long story short, we were blessed to purchase the property that borders theirs.
A shot of our little Cottage from behind the pond.
Anyways..
We’ve owned the property for more than 7 years and have learned a lot about maintaining the property and living in the country.
Don’t get it twisted though…
We are not the people who bought a piece of land, dug a well and lived in a trailer for years while we built our own house. For that advice, you’d have to check in with my Aunt next door haha.
Notice this beautiful view being obstructed by pesky power lines.
Power
The Cottage has standard power. No fancy solar panels and definitely living ON the grid BUT when you live in the country natural disasters seem to be more prevalent.
One Summer, due to the wildfires and drought we spent almost 2 weeks solid without power because our electric provider shut it off. No one in the city had to deal with this inconvenience.
Additionally, storms knock out the power more often and if the land has lots of trees on it that can be a hazard to power lines. In general, we are without power more often than the town 20 mins away for a multitude of reasons.
Morrus, our Great Dane, hanging out in the grass on a Spring day
The Well
Talking about power…the well is an essential device to get your water from the water tablet underground to your dining table and it runs on electricity.
I am no well expert but it’s a simple process. A hole is dug deep into the ground, PVC pipe will go down a ways until the rest of the hole is carved into the solid earth and into the water table where a pump is submerged. Wires and a tube come up to the surface to bring the water to a water tank that fills every time you turn on a facet in the house.
These things break. While some people don’t have problems for 30 years, sometimes a lizard crawls into your well pump panel and frys the whole thing at 8pm on a Friday. Yep. Been there, done that. Then you get to spend the weekend without running water and that can be ROUGH.
Work on the well can be expensive. When we needed to replace the panel, it was a surprise $2,800 or when I urgently needed a new pressure tank and it cost $1,500 four days after Christmas.
Propane
Ovens, stove-tops, dryers, hot water heaters, furnaces, or even generators can run on propane and everyone out here uses them. The first couple years we rented The Cottage we were busy working adults who would forget to call to have our tank refilled. When you run out of propane you have no hot water and this is SUCH a problem. You won’t realize how much you use warm water until you don’t have it anymore.
I’ve learned to set an alarm that goes off once a month. Logging the percentage of propane left in the tank monthly helps me monitor not only when to call for more but also gives me an idea of how much we use. Helping budget for that expensive phone call I make every 6 months for the propane company to come and refill our tank.
If you’re curious, in 2023, 150 gallons of propane was about $450 and we use around 25 gallons a month.
Snow storm hit while I was out grocery shopping. Came home to driveway completely blocked by a tree. If you look close you can see my wonderful uncle in the snow chopping up the tree so I can get my car up to the house. Family is so great to have when living out here.
Trees
This definitely depends on where you live. Here in Northern California, near Tahoe, we have lots and lots of trees.
When you own property you own more trees.
Not only do trees increase the risk of wildfires but threaten powerlines, have a chance of getting hit by lightning, risk falling, drop branches, and attract wildlife (such as those dreaded squirrels).
Irrigation Water
Even if you don’t plan on a crazy garden, you’ll want water spigots at least a few hundred feet away from the house.
About 30 acres away there is a manmade irrigation creek where we get gravity-fed water to water trees, lawns, livestock, gardens, etc.
In our area, we are offered up to 1 inch of water thru Summer and/or up to 1 inch of water through WInter. Most of us around here only pay for Summer water to keep the lawn green, water the fruit trees, garden, and pond.
Summer is from April til October and it costs us a painful $900 a year, once a year.
Having property is also another maintenance thing. Last year, we had an old pipe underground crack and had to dig it up and repair it.
Septic
Septic is something you have to take care of. Putting bleach down the drain can kill all the bacteria in your septic. The bacteria is important because it eats away at everything down there and keeps it running smoothly. So NEVER use bleach if you are on septic!
Also when using new products in your laundry, for cleaning, or deciding to dump anything down the drain make sure it’s septic safe.
There is also a lot of controversy about using the products to keep a healthy septic tank because a lot of the time that stuff is meant to eat away at everything, including your good bacteria. Opt for a more enzyme-based cleaner to keep stuff in there natural and biodegrading.
Calling a company to pump the septic once every 10 years or so will also keep your tank healthy and will keep you from ending up with a lawn backed up with septic.
Animals
Maybe you’re thinking about moving to the country and getting chickens and a garden. Be prepared to need to put up heavy fencing.
Chickens get eaten. It’s just a fact of life. We have had predators literally rip fencing out of wood paneling to get to the chickens and it is devastating. Also gardens get eaten by deer, bunnies, birds and bugs so much more than in the city.
We get skunks all the way up on the porch sometimes. Outside cats are always at risk of not coming home. Random loose dogs make it to the property sometimes, which can be very nerve-racking. Squirrels, moles, and gophers destroy every flat surface of our property with holes and piles of dirt.
There was a bobcat that grabbed a squirrel right off our backyard area a couple of years back.
Wildlife is everywhere when you’re in the country. It can be equally frustrating and absolutely amazing.
Deer, bunnies, and all the birds make sitting outside on a spring day a lovely experience. We have a pond and the frogs and fish are always a treat. During winter we get ducks that spend their mornings silently swimming around and in the evenings they spend doing mating dances and making a ruckus.
Me wearing waders, standing in our pond clearing like 12 ft of reeds. The work of owning acreage never ends. Link to my favorite waders.
Everything Else
Last but not least I just wanted to touch on a few other things about owning property that maybe don’t need their own category but are worth mentioning.
Manual labor becomes part of your life. There are ALWAYS things to do on the property that aren’t fun, but they hang over your head just like vacuuming or dirty dishes, so get ready for that.
Quiet space is a beautiful thing you live country. When my neighbors leave, 15 acres away, I know it cause it’s so quiet out I hear them driving down their driveway. I love this aspect but some people might find it lonely. I used to be uncomfortable being home alone past dark just due to this fact and it should be considered.
Driveways are something else that can be a big deal that needs regular maintenance. We have almost a mile-long driveway and it needs to be re-graveled periodically which can be expensive.
Lawn Maintenance, and I’m not talking about a quick mow in the backyard once a week. Every year the property needs regular weed-eating and mowing done with a riding lawn mower at least a few times before summer dries it all out.
Conclusion
If you are considering buying a house with acreage I hope this helped. I can’t imagine living in a city again. While none of these things mentioned should be taken lightly when deciding to move to the country, living out here is totally worth it.
My husband and I aren’t big DIYers, don’t like manual labor, and spend plenty of weekends inside the house but we wouldn’t trade our land for anything.
Being able to walk the dog on my breaks in sweatpants and not be seen by anyone is absolutely priceless. Buying the Cottage might have been a mistake because it is an ugly little run-down house but there is no doubt in my mind that this little piece of property was meant to be ours.
I can’t recommend buying property is for everyone but it sure is a blessing and a joy.
Also, I there are so many health benefits of living on acreage. For example, I always get a chance to do some healthy grounding and get the benefits of enough sunlight.
Have you bought your dream property??
Are you still working on buying your house with acreage?
Where do you want to live?
Do you have any other input about the list I created??
Please share in the comment section, I would love to talk more about this!
Summer is a time when the kitchen really shifts. For me, at least. The slow cooker, the Dutch oven & the coffee frother get stashed away and it’s time for fruit bowls, the large iced coffee mugs & the popsicle molds.
Hope everyone is as excited as me for summer! Can’t wait to do some swimming and host some friends and family. Anyways..lets get into it!
Keep in mind that this post contains affiliate links and that the author will gain a small commission if you make a purchase at no extra cost for you!
Juicer
Photo Credit: Amazon
When I met my husband he had one of these classic glass juicers and of course, I completely adopted it and now I use it for fresh lemon juice and orange juice!
There is something so satisfying about using one of these. Always so satisfying to make some homemade lemonade. This is a great addition to any kitchen!
No summer is complete without some delicious smoothies in the morning. I’ve owned my Vitamix for years (I’m talking like 10 years) and even though it’s kind of pricey it is so worth it! There’s nothing it can’t do, plus…you can make soups in the winter and even grind your grains!
If you’re looking for something a little cheaper but still ultra reliable this NutriBullet is perfect! I used it for 5 days a week to make smoothies for the husband years and it held up great!
Who doesn’t want popsicles in the summertime?! Cool, refreshing, and delicious! Make them with fresh fruit, juice, yogurt, coconut milk, or I even saw a recipe where they made them with Oreo pieces as Cookies and Cream, yuuummmm!
Not to try and totally sell you on this specific set but it’s pretty awesome, even comes with self-adhesive baggies to make them and store them in the freezer for later.
Make some pops to keep a nice cool snack on hand for when the kids are looking for something to munch on. For me, it’s when I come in from a hot walk with the dog and just need to cool down a bit! Can’t recommend enough!
These absolutely come in handy. In my family we don’t really drink much wine but they will work for other glasses and they are just so darn cute for summer!
As a great alternative, these silicone-colored bands for any type of drink container will be perfect for your next summer get-together!
Though these don’t have flamingos and flip-flops on them, they are more practical in a family that is known to confuse more than just a few wine glasses. These are a win in my book!
Pick some up for your next gathering so you don’t have to hear someone say “Was this one mine?” and everyone gets that confused look on their faces. Haha! Good times…
This is a summer staple in my family. There is always one of these beautifully filled to the brim with fresh salad (or a delicious bagged salad from Costco because who always has time to make a fresh one, am I right? =P)
There is something just so elegant about having a giant salad to serve with any meal and when it’s in one of these large bamboo bowls with its special utensils…it’s just something special.
This gadget is great! While it’s summertime and you’re making fresh salads, pasta salads and other veggie dishes to keep cool, this spiralizer gives everything such a fun look and will turn any of your veggies into noodles!
I love my spiralizer so much! I use it regularly to turn zucchini into noodles to sub in to make low-carb spaghetti and it’s always a delicous, low-carb, and refreshing dish! Perfect for summer time.
As much as I love glass drinkware, there is something to be said about acrylic cups when everyone is outside with their drinks. The last thing you want is someone shattering glass where there are a bunch of bare feet running around or near the pool.
This set of 8 tumblers is beautiful and would be sure to bring brightness to any gathering!
We talked about how great popsicles are for summer but we can’t forget about the ice cream! Over the last couple of years having homemade ice cream has become really popular. A fun activity to do with the kids or friends on a hot afternoon.
This device makes ice cream, sorbet and frozen yogurt! So worth it and so delicious!
This may be my favorite one…this tray has a spot to keep ice at the bottom so no more bites into warm carrots halfway through the party. I know you know what I’m talking about haha.
I fill mine with so many great snackable veggies to leave out all thru the party. It can also be used to put fresh burger toppings like pickles, tomatoes, onions & lettuce! The lid will also keep the flies and gnats out! Fantastic!
I love these and have been using them since last Thanksgiving. Having fresh juice, iced coffee, or lemonade in these would be amazing.
Realistically though, being able to pour that juice I bought from Costco into one of these really trendy containers makes me look fancy when company comes over. I’ve also put my coffee creamer in them, once again, fancy factor when guests are over.
Alright this may be a total no go for some people who have great grills and smokers, who use them all summer, or even all year long. For me, I don’t have a good spot for a grill right now sooo I jump for the next best thing!
I’ve had my reliable George Foreman for years and years and it’s so nice to use instead of heating up the stove top when it’s 110 degrees outside! It grills things like chicken and burger patties up just perfectly and with its removable plates, it’s super easy to clean and put away after. No pans and messy stove top!
To all my coffee and tea drinkers, we all need a nice tumbler to enjoy our caffeine. Something I have always preferred is when I can see my beautiful drink. These cups are beautiful, trendy, and sure to keep you smiling while staying awake through hot summer afternoons.
Make your fruit salads even more fun with this AWESOME melon baller kit! Not that fruit salad needs any extra anything because it’s always a hit anyway but this really upgrades a regular fruit salad to extra fancy!
This colander…I watched a YouTuber about 6 years ago review this and it was something I just KNEW I had to have. It was NOT money wasted. It’s wonderful!
You set the colander inside the larger bowl to wash the fruits or veggies in the bowl full of water, then you just lift and drain. It’s awesome!! I feel it gives me such a nice way to really deep clean all the leaves of leafy greens.
Can’t recommend this enough! Of course, you’ve heard me say that a few times by now! Ha!
So that’s it! That’s my list for this summer of the must-have kitchen products to purchase today! If you own any of these things please let us know how you love them in the comments. If you have any that you think I’ve missed let me know!
I hope you have enjoyed this list as much as I enjoyed putting it together! Please subscribe for more fun content like this!
It has taken me WAY too long to post this recipe. This easy pesto lasagna is creamy, cheesy, and so darn easy.
My mother gets full credit for this recipe she made when I was young; it quickly became one of her “known” meals. You know what I mean? Every time someone brings a dish somewhere, there is always that dish that people request..that was this dish of hers.
Reasons this Pesto Lasagna is fantastic
Easy to prep the day before and leave in the fridge til you’re ready to pop it in the oven.
Great leftovers! These leftovers are perfect for lunch or dinner the next day.
The cheesy, ooey-gooey, warmness of this dish is the perfect comfort food.
Undeniably a crowd pleaser!
Layer and Layers of Goodness
How to make this beautifully layered dish:
After the sauce is made and the meat is cooked..a decent layer of sauce at the bottom of the dish stops anything from sticking. Additionally, tilting the dish to coat the walls keeps everything from sticking on the sides.
Second, ingredient down is some cooked turkey. Just a thin layer will do.
The reason I suggest the no-boil noodle is ease! They are the easiest way to make lasagna and you really can’t taste a difference. I have even used to the Gluten Free ones (Buy here) and they are delicious! Anyways, open that box and lay down a full layer of noodles, completely cover the dish, breaking the last noodle to make everything fit without overlapping.
Next is more sauce, since the noodles aren’t cooked it makes it easy to spread a nice thick layer of sauce over each noodle. (Keep in mind that because the noodles are no boil they will need to be surrounded in moisture to come to soften in the oven.)
Another layer of turkey but save just a little for the top layer (about a handful)
Then another modest layer cheese, finally the final layer of noodles, more sauce on top of those. FInally onto the last layer. Add the rest of the turkey, a generous layer of mozarella then top with a little freshly grated parm cheese and a sprinkle of garlic salt. The parm cheese and garlic salt are definetly optional but I highly recommend it as it adds a lot of depth to the dish.
This lasagna can be done in under an hour or prepped the day before and just tossed in the oven when you’re ready. Enjoy this creamy, dreamy, and easy recipe!
1/4 cup fresh Parmesan Cheese and pinch of Garlic salt (optional but recommended)
Instructions
Preheat oven to 350 Degrees
Cook ground turkey on skillet til done, do not overcook.
Prepare Pesto sauce as directed on package
Whisk evaporated milk, Knorr Creamy Pesto sauce packets and butter in sauce pan
Heat slow, whisking often til done (as directed on package)
Layer Lasagna as follows: Bottom layer, cover bottom with thin layer of sauce, thin later of meat, noodles straight from package, cover the whole 13×9 pan, sauce on top of noodles, layer of meat, good layer of cheese, noodles, sauce, meat then cover the dish with nice thick layer of cheese to top it off.
Sprinkle fresh grated parm and a pinch of garlic salt over top the dish
Cover dish in foil and poke some holes in foil
Bake in preheated oven at 350 for 25 mins. Remove foil and cook for another 10 mins til cheese is browning.
Autumn is a time for cozying up at home and enjoying the changing leaves. It’s also a great time to decorate your home with fall colors and accents.
Here are some of the best autumn decor trends for 2023:
Natural elements: Natural elements are always a popular choice for fall decor. This year, look for pumpkins, gourds, corn stalks, and branches in warm colors like orange, yellow, and red. You can also use natural materials like wood, burlap, and leaves to create a rustic fall look.
Bold colors: Don’t be afraid to use bold colors in your fall decor this year. Popular colors for fall include navy blue, emerald green, and mustard yellow. You can use these colors in your pillows, throws, and other accessories to create a stylish and inviting space.
Texture: Texture is another important element to consider when decorating for fall. This year, look for items with different textures, such as velvet pumpkins, burlap banners, and dried flowers. The variety of textures will add visual interest to your space and create a cozy atmosphere.
Mix and match: Don’t be afraid to mix and match different fall decor styles this year. You can create a unique and eclectic look by mixing traditional pumpkins with modern geometric shapes. You can also mix different textures and colors to create a visually interesting space.
No matter what your style, there are plenty of great autumn decor trends to choose from in 2023. So get creative and have fun decorating your home for the fall season!
Here are some additional tips for decorating your home for fall:
Start by choosing a color palette. This will help you to narrow down your choices and create a cohesive look.
Use natural light to your advantage. If you have a lot of natural light in your home, you can use it to brighten up your fall decor.
Add some greenery. Plants and flowers are a great way to add a touch of nature to your fall decor.
Don’t forget the details. Small touches, such as candles, coasters, and napkin rings, can really make a difference in your fall decor.
With a little planning and creativity, you can easily create a beautiful and inviting fall home. So get started today and enjoy the cozy season!
It’s time for Mother’s Day again! Time to show mom just how much you love her. This list is also full of great ideas for mom’s birthday or any other reason to just have a good day with her.
Every year my husband and I try to do something super special for his mom. I am so lucky to have been blessed with a mother-in-law that is so wonderful and she is always there for us so we try to make her feel as special as she makes us feel all year long.
Some of these ideas might seem extravagant but I see holidays, gatherings, birthdays, and trips as an excuse to just do something fun! I’d like to point out that most of these ideas are outdoor activities because Mother’s Day falls in May, a beautiful time to get some fresh air! So let’s get into it..
One more, and VERY IMPORTANT thing before we start…TAKE PHOTOS! The older I get the more I forget about photos and get comfortable just being in the moment. As family members start getting older it’s so important to have these photos for memories.
I know..this is a cheap shot. But we all know going out for a nice breakfast is a lovely way to start the day. Plan lunch if that’s more time appropriate. If I plan an activity mid morning we will usually go out for lunch afterwards. A meal out with loved ones is always a great time, it’s just memories to add to the bank. My favorite thing to do is look outside my normal scope of restaurants and look for something unique. For example we have a restaurant that’s ON a boat on the Sacramento River and we have a bar/restaurant that’s totally open air and over looks the mountains in Nevada City.
2. Horseback riding
This is one of my mother in laws favorite adventure activities. We’ve done this for birthdays and Mother’s Day. It’s always a hit! If you look up places on Google look for places that walk thru trees or along a body of water cause being up there can get warm if you’re stuck in the sun the whole time. This is an activity most age groups and most fitness levels can really enjoy. Prices can vary depending where you live from about $40 to $120 per hour.
3. Take a trip to a Nursery
This one can be so fun! Nearby where we live we have this amazing nursery that also has a cafe in it. This most amazing little place called High Hand Nursery in Loomis, CA. It makes for the most AMAZING morning. If you don’t have a local nursery cafe nearby go out for breakfast near a local nursery then take a walk thru the plants and maybe buy mom a plant to remember the wonderful day by. Knock out a great day and a gift all at once!
4. Flower farm
This one kind of piggybacks off of number 2 but I really believe it needs a spot of its own. There are tulip farms in cities all across the world! The one near us is wheelchair accessible and winds thru gorgeous gardens. There is a viewing area to just sit, relax and look over the beautiful mountains. Anyone of either sex or any age will absolutely love this, it was seriously a treat for everybody. This happens in our area from April into May so check dates!
5. Head towards a body of water!
This sounds funny but it’s true. Head for a local lake or beach. Pick up lunch, pack a picnic, or find a restaurant overlooking the water. There was a study done that said 20 minutes spent by a body of water is scientifically proven to boost mood. If not eating near the water bring a fun game such as this portable cornhole game or this fun frisbee game to play for a couple hours before heading out for a meal or drinks.
Don’t forget about water activities too! Depending on your weather a boat ride, catamaran ride, whale watching, tubing, or something else are all real fun ideas too!
6. Hot Air Balloon
Alright alright, this might sound a little wild. I recently thought about doing this activity and was SO SURPRISED how many places offer this! Just punch in “Hot Air Balloon rides” on Google maps and I can almost bet u’ll be surprised! Wanna give mom an experience not to forget?? This is for sure one of those experiences.
7. Wine tasting
If mom enjoys some nice glass of wine this is a lovely option. If you have siblings you all can take mom to wine tasting. Having the time to bound and spending time as adults is such a special thing.
8. Go for a hike
And this one’s free! AllTrails is my favorite website to use to find hiking trails all over the country. I love to filter my results by length, I like a good loop trail and they even have preferences like elevation gain or wheelchair accessible. Also looking at the photos to see trails with good tree cover or highlights like waterfalls. Fresh air is good for everyone and every occasion.
9. Go downtown
Most cities have a cute quaint downtown area with little shops to explore. I would just love a day of walking thru downtown. Stop into the old ice cream shop for a treat and buy a couple small things from another shop. When I travel to other places I’m so likely to stop in to the local shops and spend some money but my little towns have shops just as cute! Be a tourist in your own town to make the most of where you live.
10. Spend time with mom. Or not.
Mom just wants to feel loved. If mom still has young kids, offer to babysit! Offer mom to get to have some time on her own. Let her take a bath kid free. Send her to Target or Hobby Lobby all by herself so she can enjoy a little retail therapy in peace.
Maybe mom is older and doesn’t have her kids around much anymore so just spending time with mom can be so special. I always feel the need to plan a bunch of things to do but in all honesty she just wants to spend time with her family. Bring family to mom and let her bask in the wonderful people she spent so many years of her life raising and caring about.
Welp…that’s my list! I really hope you got some great inspiration of how to make mom feel special on Mother’s Day. The day dedicated celebrating all her hard work raising the next generation.
You have to go get some sun right now and here’s why..
So here in Northern California it has been raining for what feels like months. Everyday is overcast, raining and cold. I have always been a winter kind of gal til this year. We have had a non-stop wet and cold season and while I should just be thankful for all the water and snow pack..I’m ready for some sun.
ANYWAYS, since we haven’t seen the sun in at least a week I wanted write up a list about the importance of sun and what getting just a few minutes a day does for us and our health, both physical and mental. If ur anything like me you’re always standing in the shade or have a hat on in the sun, but we gotta get a little sunlight! Also, 1 bonus tip at the end which may be my favorite of them all!
1: Vitamin D
We all know that sun exposure provides us with essential Vitamin D we need. But..
How much sun do we need?
10-30 mins of midday sunlight provides us with a fair amount of Vitamin D.
Benefits of Vitamin D:
Assists in the absorption of calcium and phosphorus which,
Keeps bones strong
Reduces cancer cell growth
Helps control infections
Reduces inflammation
Helps control high blood pressure
Boosts the immune system
Mushrooms are also a great source of Vitamin D
2: Serotonin
The science behind the process of absorption of Serotonin is absolutely fascinating.
When sunlight hits your eyes it actually stimulates the retina sending signals to the brain to make serotonin. The body is just so amazing!
Benefits of Serotonin:
Mood booster
Creates a healthy appetite
Aids in digestion
Promotes better sleep
Improves brain function
Increased libido
My Great Dane rolling in the grass soaking up the sun
3: Sleep
Soaking up the sun in the morning is fantastic to help keep our Circadian Rhythm (body’s internal clock) healthy.
Getting up in the morning and opening the blinds and letting the sunlight in is so crucial to letting our body know it is time to wake up and get going for the day. This causes your hypothalamus to send signals to your brain when to wake up and when to go to sleep. Which, in the long run, can help you wake up easier in the morning and get to bed at a decent time.
4: Energy
We kind of touched on this one because we went over the vitamins you’re getting from sunlight but I wanted this to have a spot of its own. Energy is something, I feel, at least 90% of people always want more of! Wether you need it to keep up with your kids, your pets, cleaning, cooking or just trying to get through that 3pm slump most of us could always use a little more energy.
When that midday nap time creeps in something that is proven to help is take 10-15 mins and just go outside. Just go stand in the sun. Put ur phone in ur pocket or leave it inside and just stand there, let it warm your face, turn around and let it beat on your back. Just close your eyes and be in that sunny moment. I can almost guarantee when you go back in you will feel a little more awake!! At least for a little while, then maybe it’s time for more coffee.
5: Happiness
The sun is such a mood booster. Have you ever experienced weeks on end of clouds and rain?! Eventually you’ll start to feel just generally sad or depressed. Which is my theory why people who live in warm, sunny places always seem generally happier. It’s just all that beautiful sun!
Sunlight naturally boosts our mood with that thing we talked about earlier, Serotonin! It increases production no matter the temperature outside! So even if it’s cold, bundle up and head outside to let as much skin as you can absorb those rays!
Bonus tip:
Earthing
Since we’re talking about the importance of getting outside for a little sun each day I wanted to mention this tip.
You should stand on earth ground for at least 15 mins per day with bare feet. The benefits of this are seriously impressive from everything from helping headaches to blood pressure to relieving stress.
Something I always do now when I have a headache is go and Earth a little bit. Grounding yourself causes a fusing of electrons in your body with the rest of the earth. There have been some seriously fascinating studies done about it. Someday soon I’ll write about it and include it here.
I could write a whole post just on this but we’ll just keep it short. For about 15 mins a day take ur shoes off and walk across ur yard or sit in the grass and just feel the ground beneath ur toes.
Earthing at it’s best
Conclusion
Sun is essential for our existence but it also can have serious internal health benefits if we take advantage of what it has to offer.
So next time you’re feeling down, sickly, tired or even just lazy go soak up those rays! They may just make your day!
This Chicken Fried Rice is filled with protein and vegetables making it perfect to enjoy as an impressive side dish or as a whole meal. It is nutritious and delicious!
Why we love this Chicken fried rice
Chicken fried rice is one of my favorite dishes. It has protein, veggies, carbs, and everything you need to make a full meal. I was used to buying this 1 specific packet of seasoning to make my fried rice, it was my tried and true. One day my grocery stores stopped carrying it, I couldn’t believe it, I couldn’t make my fried rice without it! That day I decided I would use the ingredients listed on the back of the packet to make my own. It was the first time I had done this; I was so proud of the results.
This fried rice recipe is super kid-friendly, the onions are even diced really small, and it is just filled with delicious flavors that almost any palette will enjoy. This is a dish I have made when having company over and even when attending a potluck. It travels well and always gets completely eaten up.
Picking Chicken for the fried rice
Chicken thighs are my new favorite love. They are always juicy and so tender.
Cooking with chicken breasts is easier when it comes to cutting them up in my opinion. If you are kind of picky like my husband and I, you stand there in the kitchen cutting all the ick off the chicken thigh before cutting it up. But…absolutely, 100% worth it.
Chicken thighs have such superior flavor.
Other Ingredients
The rest of this recipe is pretty simple, substitute things as you see fit and make this your own!
Rice: The pictures in this post were made with long-grain rice, but Jasmine Rice is my favorite kind of rice to make this recipe with as the fragrance gives it something special, and the granules just seem to hold together better.
Eggs: The recommendation for eggs is always just ‘use high-quality eggs’ Homegrown eggs are by far the best, but if that is not an option, I suggest just purchasing some good ones from the store. The large yellow yolks add color and flavor to the dish.
Soy Sauce: A great way to make this dish totally gluten-free is to substitute Soy Sauce for Coco Aminos. They have a similar taste, and the chicken fried rice quickly turns gluten-free!
Ginger & Garlic: In this recipe, I stated powder for both of these. If you have the time, will, and energy, please feel free to add fresh instead! Fresh is ALWAYS better. My preference is to keep prepackaged minced ginger in the fridge; easy and fresher than powder.
This dish is great with a side of egg rolls or pot stickers, not that it needs it. A wok is the best pan to make this dish with but if you don’t own one a large non-stick pan or even a large non-stick pot works fine. Enjoy!
Author:Taylor Fuller
Prep Time:20 mins
Cook Time:15 mins
Total Time:35 minutes
Yield:About 4 full meal servings 1x
Category:Family Dinners
Cuisine:Asian
Diet:Gluten Free
Ingredients
Scale
1 lb Chicken Thighs, skinless & boneless
3 cups Cooked Rice, cold
1/2 cup Diced Onions, white or yellow
2 Eggs, beaten
1 cup Frozen Vegetables, cooked
2 tbsp Soy Sauce or Coco Aminos
1 1/2 tbsp Sesame Oil
1 tbsp Garlic Powder
1/4 tsp Ground Ginger
1/2 tbsp Sugar
1/2 tsp Black Pepper
1/2 tsp Salt
1/8 tsp Paprika
4 tbsp Cooking Oil (I use Avacado oil)
Instructions
Cut chicken thighs into bit size pieces
Heat oil in wok or large non-stick pan over medium heat. Cook chicken thighs for a few minutes and then add onions. Continue to cook til chicken is fully cooked and onions are soft. Then remove chicken and onions from pan and set aside.
Heat 2 tbsp of oil in pan and add 3 cups of cold rice. Break up and saute for 3-4 mins.
Add Soy Sauce, Sesame Oil and all seasonings (garlic, ginger, sugar, pepper, salt & paprika) and stir til coated evenly.
Push rice to the side and add the beaten eggs, let cook then add to rice
Add chicken and cooked veggies. Continue to cook for another min or 2 til everything is thoroughly heated. Enjoy!
Notes
Chicken breasts would be fine for this recipe, the great thing about thighs is how juicy they are.
Rice should be cold, I usually make a batch of rice earlier in the day or the day before and just toss it in the fridge til it’s time to make dinner. If you don’t have time for this Minute Rice is a great alternative and just let it cool a bit before using, for some reason it works great.
Jasmine Rice is my favorite for this although Long Grain rice is totally fine
The frozen bag of veggies I usually buy for this is the peas, carrots and green beans, so yummy!
These will blow your socks off. No joke, these are the best homemade cinnamon rolls you’ve ever had. My excitement to share this recipe cannot be contained! Lets get started!
Cinnamon Roll History
Cinnamon rolls began in Sweden as a yeasty roll with cardamom embedded and sprinkled with coarse sugar on top. When cinnamon rolls were brought to America, the thick, ooey gooey frosting that we all love was introduced. At some point we decided this could be a breakfast OR a dessert. Hahaha… I could enjoy this dish for breakfast everyday of the week but it should probably be accompanied with some protein, such as bacon or The Best Scrambled Eggs.
Bread Machine
This spectacular dough is made in a bread machine. The bread machine turns this long process into a very passive way to make these. There is a lot of “do it and walk away” which is so convenient. If you don’t own a bread machine, I highly recommend considering picking one up!
Using a bread machine to make dough for things like bread, biscuits, soft pretzels, dinner rolls or french bread loaves makes the machine a great investment.
Yeast
Living yeast cells thrive in warm, moist and starchy environment. When these little cells are comfy and happy they thrive, poofing up to make a soft dough full of air pockets. Be careful with the tempurature of the ingredients due to the sensitivity of the yeast. If the milk is too hot it will kill the yeast and if not heated the cells won’t activate.
For more info check out my article **Best Baking Tips.
Homemade Dough
The dough consists of all the usual suspects flour, sugar, eggs, butter and of course that special yeast. It’s the rising that’s important. The amount of time stated in the recipe for resting and rising is crucial.
“Let rise in a warm place”
– Every baker ever
“Let rise in a warm place.” The common statement we always read in recipes involving yeast leavened dough. This statement always messed with my head. My refrigerator never seems warm on top. Is room temp warm enough? If I pre-heat the oven and set the dough on top will that be too hot?? These thoughts drove me crazy for years! So I did the research for both of us!
Turns out the right “warm” temp is 75 – 78 degrees. If your fridge is warm that’s a great place, I elevate mine in the house a bit since heat rises. When it’s a little cooler in the house just let them sit a few extra minutes, they have always turned out perfect!
This dough will be soft and malleable, not too sticky and not tough. I’ve worked with plenty of different dough in the past and this dough is just lovely to work with.
Rolling & Baking the Rolls
Once the dough is made it’s time to style these babies up! As shown in the picture above, roll out this dough to a large rectangle, about 16 inches by 21 inches and smother in the brown sugar/cinnamon mixture. Start rolling them up from the side that is 21 inches long.
The long 21 inch roll of delight needs to be cut into 12 equal pieces. I’m sure you can see from my photo that all my pieces were uneven. If yours end up like mine…it’s fine. They all cook thru just fine haha!
Place these babies about 1-2 inches apart on a greased 9 inch by 13 inch dish and let them rest another 30 mins in a warm place. When done cooking they should be slightly browned on the edges.
Let them cool for a 5 to 10 mins so all your frosting doesn’t melt away. Then smother in this delicious cream cheese frosting, the recipe makes a really decent amount of frosting to allow them all to be thick in the goodness. Now enjoy your Homemade Cinnamon Rolls!
These Homemade Cinnamon Rolls will knock your socks off. Enjoy these for dessert or for a sweet breakfast. They are worth every minute spent it takes to make these.
Author:Taylor Fuller
Ingredients
Scale
Dough:
1 cup Milk, warm (110–115 degrees)
2 Eggs, room temp
1/3 cup salted Butter, melted
4 1/2 cups Bread Flour
1/2 Sugar
2 1/2 tsp Bread Machine Yeast
Filling:
1 cup Brown Sugar, packed
3 tbsp Ground Cinnamon
1/2 cup Butter, softened
Icing:
2 cups Powder Sugar
1/3 Butter, softened
4 oz Cream Cheese, softened
1/2 tsp Vanilla
Instructions
Place all dough ingredients into bread maker in order; milk, eggs, melted butter, flour, sugar. Then create divot in dry ingredients and drop yeast into divot. Turn on bread maker to “dough”
Once bread maker is done turn out dough onto light floured surface. Cover with towel and let rest in warm place for about 10 mins.
Prepare filling in medium bowl by mixing brown sugar, cinnamon & butter. Set aside.
Roll dough out into 16 inch x 21 inch rectangle.
Spread filling onto rectangle as evenly as possible.
Starting at the longest side, roll dough.
Cut dough into 12 pieces.
Grease 9 inch x 13 inch dish and place all 12 pieces evenly in dish, cover and let double in size (30 mins)
Preheat oven 400 degrees then bake rolls for 15 mins til edges are lightly brown
Mix icing ingredients together until humongous and spread onto rolls while still warm.
We all know the difference between bad, good and great scrambled eggs. This article hold all the secrets to make the kind of scrambled eggs you can eat with nothing else, the kind of eggs you want a whole plate of. Simple, delicious scrambled eggs.
Whether you’re trying to eat light and healthy or feeding the whole family for breakfast knowing how to make the best scrambled eggs is important. Also, it’s easier than you may think! So many recipes over the last decade advise to add this, add that, do this, do that but the perfection of eggs comes from simplicity.
So, are you ready to learn how to make the best scrambled eggs? Lets get started!
1: Buy Quality Eggs
This is probably a very obvious tip but quality of the eggs make a huge difference. A quality egg will be deep yellow, large yolk. Lesser quality eggs will be have yolk that is pale in color and the yolk will be smaller. (Home grown chickens lay a noticeably better egg than anything available to buy in the grocery store but no need to fret, just buy a quality brand of cage free eggs.)
2: Do Not Add Anything
You heard me. No milk, no cream, no cheese, no pepper, no meat. The only things that should be mixed together is egg, salt & pepper. So many recipes swear by “add milk, makes it so fluffy.” You don’t need anything to make your eggs fluffy, just leave it out.
3: Beat the heck Outta Them
Eggs should be beaten to a smooth liquid for good consistency and even cooking. Break the eggs into a bowl, add salt & pepper then just whip it, whip it good.
4: Use a Non-Stick Pan
When the eggs get any kind of stuck to the bottom of the pan that is definitely not how to make the best scrambled eggs. Using a clean, smooth surfaced, non-stick pan is the best way to achieve no flaky edges or burned pieces of egg.
5: Use Butter
Butter is what makes these eggs. Recently I made scrambled eggs with a little olive oil…it is not the same. AT ALL. Use butter if you are trying to make the very best scrambled eggs. No need to use a whole tablespoon but use enough to put a thin coating on the bottom of the pan, you want those eggs to come up cleanly without sticking.
6: Heat Low…but Not Too Low
On a scale 1-10 heat the eggs on a 2 1/2.
Heat the eggs too low and they won’t pull together. They will also ruin the lovely little layer of butter on the bottom of the pan. Heat the eggs too high and they will brown and burn on the bottoms. Even if you can save them from burning they will cook too fast to develop their flavor and will be too hot causing them to dry out. (More on the drying out later)
7: Continuously Build Egg Mountain
Once the eggs look like they are starting to form a layer on the bottom use your WOODEN utensil to PULL each side of the bottom layer towards the middle. Continue to pull more eggs up and on top as thou you are trying to make egg mountain in your pan, then break up, then rebuild. Keep your eggs together. We are trying to keep moisture in the eggs.
Melt enough butter to cover the whole bottom nicely. Add well beaten egg when pan is heated. Once you see the bottom starting to form a layer you can begin to build Egg Mountain. Continue to pull inward and upward.
8: Do Not Overcook
Seriously. This is very very important. The eggs should be cooked but moist. If there are spots of brown anywhere they are overcooked. You want the eggs to look fluffy with spots of shine.
Bonus Tip: Cover them for extra fluffiness
If ultimate fluff is what you need you can stick a lid over top of the eggs just before they are done and turn the heat down to minimum for a couple of mins. I usually do this if I’m making breakfast sandwiches and want a little extra fluff. While fluffy is nice I do not believe it helps flavor at all and to be honest this is not my favorite way, I feel leaving them in the pan increases the risk of burning.
9: Let Them Cool
Cooling another important step to take these from great to the best! Just like a good steak or Thanksgiving turkey; eggs need a min to rest. When they cool, the flavor of the salt and pepper really come out and add to the flavor of the eggs.
10: Enjoy!
Now that you have all the tips on how to make the best scrambled eggs it’s time to get cooking! My husband and I have always had eggs where people add milk, cheese, making scrambles with meat and veggies. Since learning the right way to make eggs we truly enjoy what I refer to as “Simple Scrambled Eggs” they are delish and I hope you enjoy.